ASUS router
These are the setup instructions for using a tested and recommended ASUS router in the StudNet.
Configure the router by using a cable connection between the computer and the router, since the wifi connection settings also need to be configured.
The wifi router has to be connected with the single (blue) WAN/Internet port to the network socket in your room. If you are using one of the LAN ports your network socket could be locked or the network connection will not work.
Initial installation
Open the router's configuration website. The address is printed on the back of router or can be found in the manual. The configuration website likely has one of the following addresses:
If the wifi router was set up before, please restore the factory default. Instructions on how to do that can be found in the manual.
Skip setup wizard
Skip the setup wizard by opening the following link in your browser:
- change the router login password
- confirm with Modify
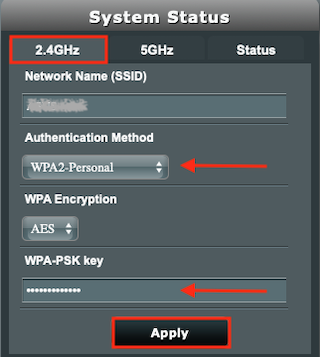
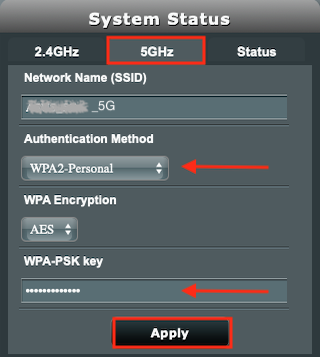
Set wifi password
Below General → Network Map → System Status set the password for 2.4 and 5 GHz
- as Authentication Method select WPA2-Personal
- set a WPA-PSK key
- save the settings with Apply
The selected WPA-PSK key will be your wifi password for connecting other devices with the router!
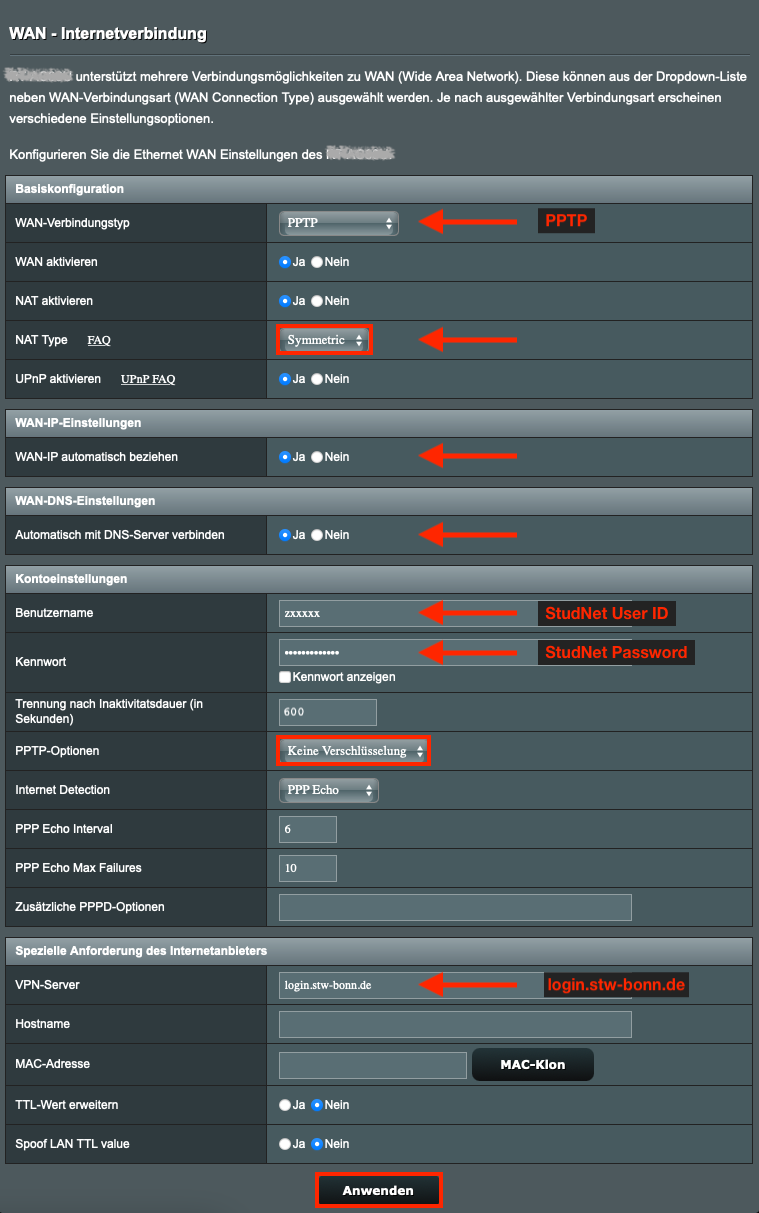
Setup Internet connection
Go to Advanced Settings → WAN.
Select the following below Internet Connection:
- WAN Connection Type: PPTP
- Enable WAN: Yes
- Enable NAT: Yes
- NAT Type: Symmetric
- Get the WAN IP automatically: Yes
- Connect to DNS Server automatically: Yes
- PPP Username: enter your StudNet user ID
(can be found in the StudNet activation email) - Password: enter your StudNet password
(which you choose at StudNet account registration) - Disconnect after time of inactivity (in seconds): 600
- PPP Options: No Encryption
- VPN Server: login.stw-bonn.de
Save the setting with Apply.
If you have lost your user name or password you can reset your account.
The router should now connect to the network.
If there are problems to establish a connection check the above settings, especially PPP Username, Password and the address of the VPN Server again.
On the devices connected to the wifi router, a dial-in using the Internet login is NOT NEEDED anymore. The wifi router will establish a connection automatically if one of the connected devices tries to connect to the Internet.
LAN network settings
Go to Advanced Settings → LAN → LAN IP
- change the IP Address to 172.16.1.1
- save with Apply
- reboot the router
To open the web interface/configuration website again you will now have to go to http://172.16.1.1
